Installing a drain hose for your Maytag dishwasher is an essential step to ensure proper drainage and efficient operation. By following this comprehensive guide, you'll be equipped with detailed instructions and tips to successfully install the drain hose. We'll walk you through the process, from gathering the necessary materials to testing and troubleshooting. With this guide, you can confidently complete the Maytag dishwasher drain hose installation and enjoy the convenience of a properly functioning Maytag dishwasher.
Understanding the Maytag Dishwasher Drain Hose
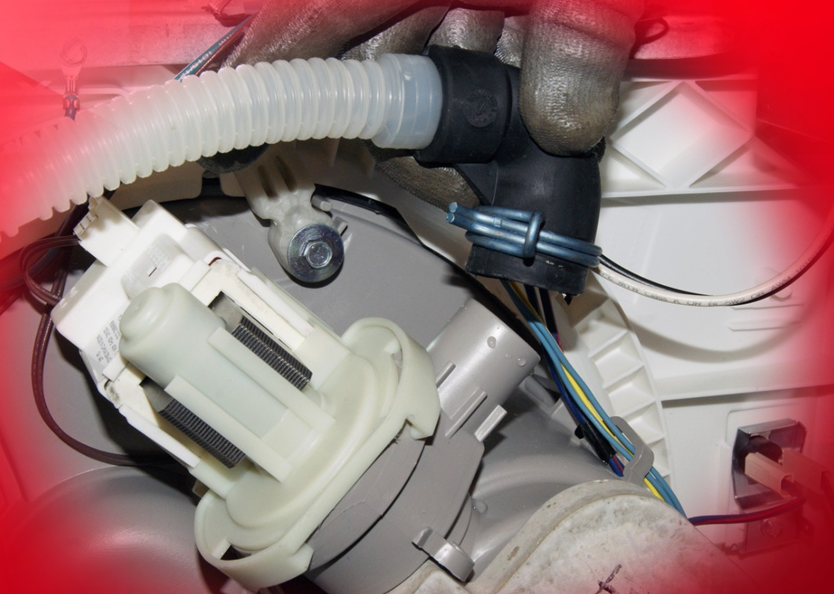
Before diving into the installation process, let's take a moment to understand the importance of the drain hose in your Maytag dishwasher. The drain hose is responsible for carrying the wastewater from the dishwasher to the drain outlet, typically located under the sink. It ensures effective drainage, preventing water from pooling inside the dishwasher and causing potential issues. Your Maytag dishwasher comes with a drain hose kit, which includes the necessary components for installation. Familiarizing yourself with these parts will make the installation process smoother.
Preparing for Installation
To start the installation, gather the required materials and prepare the dishwasher. Here's what you need to do: Gather materials: a Maytag dishwasher drain hose kit, a screwdriver, pliers, an adjustable wrench, and Teflon tape. Disconnect the dishwasher from the power supply to ensure safety. Locate the drain outlet at the back of the dishwasher and measure the length required for the drain hose. If there is an existing drain hose, carefully disconnect it by loosening clamps or connections.
Maytag Dishwasher Replacement Parts - Shop @PartsIPS
Connecting the Drain Hose
Now, let's walk through the step-by-step process of connecting the drain hose to your Maytag dishwasher. Attach the new drain hose to the dishwasher's drain outlet, ensuring a secure fit by tightening clamps or connections. Locate the drain outlet under the sink and disconnect any existing hose connected to it. Connect the other end of the drain hose to the drain outlet under the sink, ensuring a tight and secure fit. Use pliers or an adjustable wrench, if necessary, to tighten connections and create a leak-free seal. Wrap Teflon tape around threaded connections for additional sealing and to prevent leaks. Double-check all connections to ensure they are secure and properly fastened. Inspect the entire length of the drain hose for any kinks, twists, or obstructions, and straighten the hose if necessary.
Testing and Troubleshooting
Once the drain hose is connected, it's important to test the dishwasher and address any potential issues. Reconnect the power supply to the dishwasher. Run a test cycle to check the drainage. Ensure that water flows freely through the drain hose without any leaks. Monitor the dishwasher during the cycle for any signs of leakage or unusual noises. If you encounter any leaks or poor drainage, try these troubleshooting steps. Verify that the drain hose is properly connected at both ends and tighten any loose connections or clamps. b. Check for kinks, twists, or obstructions in the drain hose and straighten it for smooth water flow. c. Examine the drain outlet under the sink for blockages and remove any debris that may obstruct water flow. d. Make sure the drain hose is positioned higher than the drain outlet to prevent backflow and adjust if needed. e. If issues persist, consult the Maytag dishwasher's user manual or contact Maytag customer support for further assistance.
Genuine Branded Maytag Dishwasher Parts Online @PartsIPS
Final Steps and Maintenance
Now that you have successfully installed the drain hose and tested the dishwasher, it's time to complete the process and ensure proper maintenance. Carefully push the dishwasher back into its original position, making sure it is level and stable. Check all connections one last time to confirm they are secure and tightly fastened. Dispose of any packaging materials or old drain hose components properly. Regularly inspect the drain hose for any signs of wear, damage, or blockages. If you notice any issues, such as cracks or leaks, replace the hose promptly. Clean the drain hose periodically to prevent clogs and maintain optimal performance. You can use a mixture of warm water and mild detergent to remove any buildup or debris. Check the drain outlet under the sink regularly to ensure it is clear of obstructions and functioning properly. If you ever need to disconnect or replace the drain hose in the future, follow the same installation steps in reverse, taking care to properly tighten all connections.
By following these final steps and incorporating regular maintenance into your dishwasher care routine, you can prolong the lifespan of your Maytag dishwasher and ensure consistent performance.
Conclusion
Installing a drain hose for your Maytag dishwasher is a manageable task that ensures proper drainage and efficient operation. By following this comprehensive guide, you can confidently complete the installation and maintain your dishwasher for years to come. Enjoy the convenience and reliability of a properly installed Maytag dishwasher.
Related Content
1. How To Clean A Maytag Dishwasher 2. Maytag Dishwasher Installation
3. Maytag Oven Troubleshooting 4. Maytag Washing Machine Troubleshooting And Error Codes


